
A tired, outdated refrigerator doesn’t mean it’s time to drop thousands on a replacement. Painting a fridge is one of the most cost-effective ways to refresh a kitchen’s look, especially when appliances still run perfectly but clash with updated décor. With the right prep work and materials, homeowners can achieve a durable, professional-looking finish that stands up to daily use. This guide walks through the entire process, from surface prep to final curing, so anyone comfortable with a roller and some patience can tackle the project over a weekend.
Key Takeaways
- Painting a refrigerator costs $40–$60 in materials versus $800–$3,000 for replacement, making it a budget-friendly kitchen refresh that takes just one weekend.
- Proper surface preparation—cleaning, sanding with 220-grit sandpaper, and applying bonding primer—is essential to preventing paint peeling and ensuring the finish lasts years instead of weeks.
- Use appliance epoxy paint specifically formulated for metal and plastic surfaces; standard latex paint will peel within weeks because it can’t adhere to the fridge’s coated exterior.
- Apply thin, overlapping coats with a foam roller to avoid drips and lap marks, allowing proper drying time between coats and curing the paint fully for seven days before heavy use.
- Keep the fridge unplugged and doors open for the first 24 hours, reattach hardware after 48 hours, and avoid harsh cleaners or slamming doors for one week while the painted surface cures.
Why Paint Your Refrigerator Instead of Replacing It?
Refrigerators have long lifespans, often 15 to 20 years for major brands, but styles change faster than compressors fail. A functioning fridge that doesn’t match a renovated kitchen becomes an eyesore, yet replacing it purely for aesthetics wastes money and contributes unnecessary waste to landfills.
Painting costs a fraction of replacement. A gallon of appliance epoxy paint runs $40–$60 and covers roughly 400 square feet, enough for multiple coats on a standard fridge. Compare that to $800–$3,000 for a new unit. The project takes a weekend, requires no special skills beyond careful prep, and delivers a custom look unavailable off the showroom floor.
Beyond budget, painting offers creative control. Homeowners can match cabinetry, experiment with bold accent colors, or create a chalkboard surface for family notes. For renters with landlord approval, it’s a reversible upgrade. And because the process involves no structural modification or electrical work, it doesn’t trigger permit requirements or void warranties on mechanical components, just the exterior finish.
What You’ll Need: Essential Supplies and Tools
Gather everything before starting. Running to the hardware store mid-project with primer on the fridge leads to mistakes.
Materials:
- Appliance epoxy paint (Rust-Oleum and Krylon make popular versions: choose satin or semi-gloss for easy cleaning)
- Bonding primer formulated for slick surfaces (look for “plastic and metal” on the label)
- 220-grit sandpaper or sanding sponges
- TSP (trisodium phosphate) cleaner or a heavy-duty degreaser
- Microfiber cloths (lint-free)
- Painter’s tape (2-inch width)
- Drop cloths or plastic sheeting
- Tack cloth for dust removal
Tools:
- Foam rollers (4-inch, high-density for smooth finish)
- Angled brush (2-inch for edges and handles)
- Paint tray
- Screwdriver set (to remove handles and hardware)
- Drill with screwdriver bits (optional, speeds up disassembly)
Safety Gear:
- Nitrile gloves (TSP and solvents irritate skin)
- Safety glasses (protect from splashes during cleaning)
- Respirator or N95 mask (primer and epoxy paint fumes require ventilation)
Appliance epoxy paint is non-negotiable here. Standard latex wall paint won’t adhere to the fridge’s coated metal surface and will peel within weeks. Epoxy formulas bond chemically and flex with temperature changes.
Preparing Your Refrigerator for Painting
Prep determines whether the paint lasts two months or two decades. Most DIY paint failures trace back to skipping steps in this phase.
Cleaning and Degreasing the Surface
Refrigerators accumulate grease, fingerprints, and kitchen grime that block paint adhesion. Start by unplugging the unit or turning off the circuit breaker, not strictly necessary for exterior work, but safer if water drips near outlets.
Remove all magnetic items, door handles, kick plates, and anything else that unscrews. Store hardware in labeled bags. Mix TSP cleaner per package directions (typically 1/4 cup per gallon of warm water) and wipe down every surface that’ll be painted. Pay extra attention to areas near the handle and top edges where grease concentrates. Rinse with clean water and dry thoroughly with microfiber cloths.
For stubborn residue, use rubbing alcohol on a cloth. Let the fridge air-dry for at least an hour. Any moisture trapped under primer will bubble and peel later.
Sanding and Priming for Long-Lasting Results
Refrigerator exteriors are powder-coated or enameled, smooth finishes designed to repel stains also repel paint. 220-grit sandpaper scuffs the surface just enough to give primer something to grip without leaving visible scratches. Sand in circular motions, covering every inch. The goal isn’t to remove the factory finish, just dull the shine.
Wipe away sanding dust with a tack cloth. Regular rags push dust around: tack cloths grab it.
Mask off anything that shouldn’t get painted: rubber seals, vents, the compressor area at the back (if painting in place), and the floor around the base. Run painter’s tape along edges carefully, sloppy taping shows in the final job.
Apply bonding primer in thin, even coats. Foam rollers work best for large flat surfaces: use the angled brush for corners and seams. Most primers dry to the touch in 30 minutes but need two hours before recoating. Apply a second primer coat if the original fridge color is dark or the new paint is light. Primer prevents the old color from bleeding through and creates a uniform base for topcoats. Many budget home makeovers succeed or fail based on primer quality.
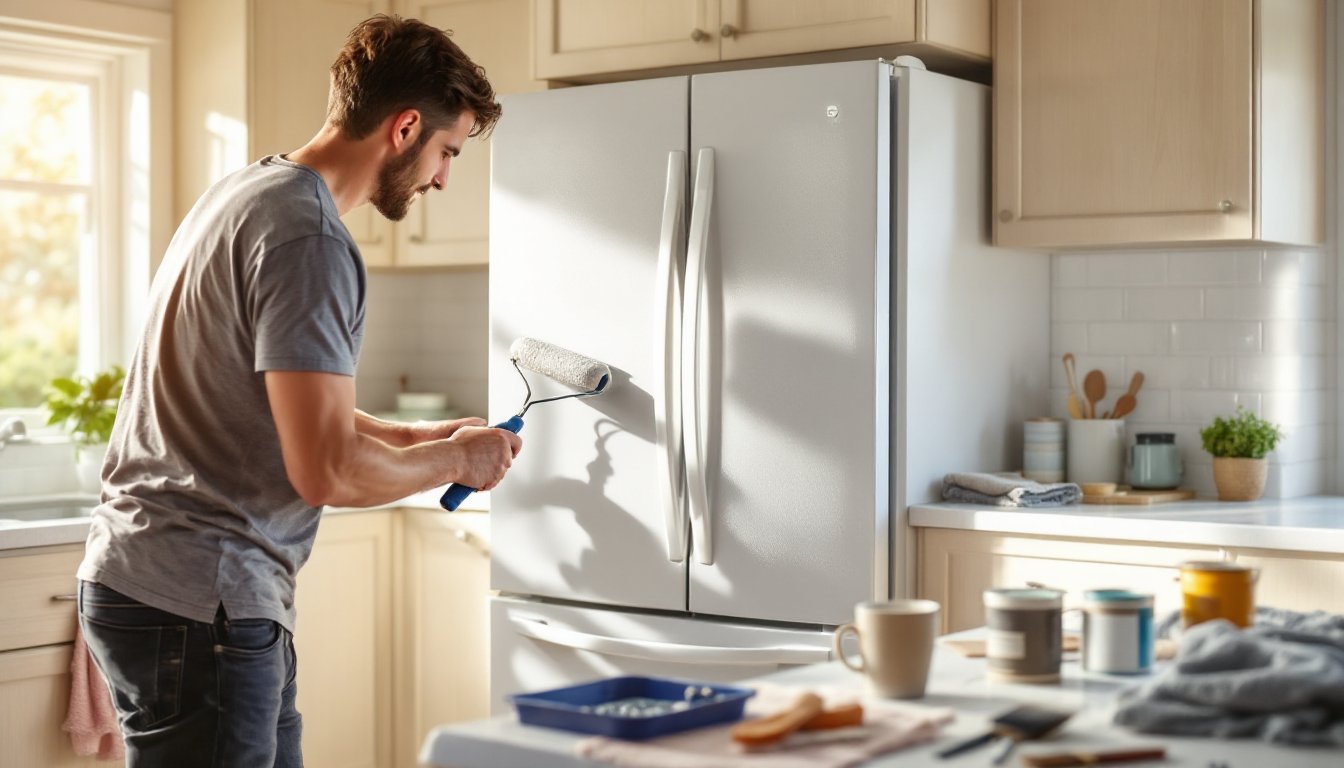
Step-by-Step Painting Process
Once primer has cured for at least four hours (overnight is better), the actual painting goes quickly.
Step 1: Stir paint thoroughly. Appliance epoxy settles fast. Stir for two full minutes, scraping the bottom and sides of the can.
Step 2: Load the roller lightly. Pour paint into the tray, dip the foam roller, and roll off excess on the tray’s ridged section. Overloading causes drips and uneven texture.
Step 3: Apply the first coat. Roll in overlapping vertical strokes, maintaining a wet edge to avoid lap marks. Work from top to bottom, one section at a time. Use the angled brush for tight spots around hinges and handles. Don’t worry if coverage looks thin, multiple thin coats beat one thick coat every time.
Step 4: Let the first coat dry. Check the paint can for recoat times. Appliance epoxy typically dries to the touch in one hour but shouldn’t be recoated for two to four hours. Rushing this causes the new layer to lift the previous one.
Step 5: Apply the second coat. Repeat the same technique. Two coats usually suffice for light colors over properly primed surfaces. Dark colors or bold hues may need a third coat. Inspect under angled light to catch thin spots.
Step 6: Touch up edges and hardware areas. Once the final coat dries, peel off painter’s tape slowly at a 45-degree angle to prevent pulling up paint. Touch up any bleed or missed spots with the brush.
Ventilation matters throughout this process. Open windows, run fans, and wear a respirator. Epoxy fumes aren’t just unpleasant, they’re legitimately harmful in enclosed spaces. Painting a refrigerator requires the same precautions as any solvent-based project.
Drying, Curing, and Reassembly Tips
Dry and cured aren’t the same thing. Paint dries when solvents evaporate, but it cures when the chemical bonds fully harden. Appliance epoxy needs seven days to cure completely. During that week, treat the fridge gently.
Leave the unit unplugged and doors propped open for the first 24 hours to allow maximum airflow. After that, reconnect power and restock food, but avoid slamming doors, sticking magnets on the surface, or scrubbing it. The paint is still soft underneath.
Reattach handles and hardware after 48 hours, when the paint can handle light pressure. Use a screwdriver carefully, metal tools can gouge fresh paint. If hardware holes don’t line up perfectly, don’t force screws. Painted surfaces are slightly thicker than bare metal, so some adjustments may be needed.
Kitchen traffic is unavoidable, but keep heavy items off the top for the first week. Placing a cutting board or dish rack on uncured paint leaves permanent impressions.
Cleaning requires patience too. For the first month, wipe spills with a damp microfiber cloth only. No abrasive sponges, no harsh cleaners. Once fully cured, the surface handles normal kitchen conditions, just avoid anything that would scratch factory enamel. Kitchen organization tips often recommend keeping high-traffic appliances clean with gentle, regular maintenance rather than aggressive scrubbing, which applies doubly to painted finishes.
If chips or scratches appear later, touch them up immediately. Keep leftover paint sealed tight in a cool, dry place. Epoxy has a shelf life of about two years once opened.