
Painting wood kitchen cabinets transforms a dated kitchen without the $15,000–$30,000 price tag of a full remodel. But here’s the catch: the difference between a smooth, durable finish and a sticky, peeling mess comes down to prep work and technique. This isn’t a quick weekend project, it demands patience, the right materials, and an honest assessment of the cabinet condition. Done correctly, painted cabinets can last a decade or more. This guide walks through every step, from degreasing to final coat, so homeowners can achieve professional results with DIY effort.
Key Takeaways
- Proper preparation through degreasing and sanding is essential for painting wood kitchen cabinets—skipping prep work guarantees paint chipping within months.
- Use a bonding primer and acrylic alkyd or cabinet enamel paint in satin or semi-gloss finishes to ensure durability and cleanability in high-moisture kitchen environments.
- Apply thin, multiple coats rather than one thick coat, and sand between coats with 220–320 grit paper to achieve a smooth, professional-looking finish.
- Allow painted kitchen cabinets to cure fully for 7–14 days before reinstalling hardware or doors, as premature handling can cause dents and marks.
- Painting wood kitchen cabinets transforms your kitchen for a fraction of the cost of a full remodel while delivering results that last a decade or more with proper technique.
Preparing Your Wood Cabinets for Painting
Most cabinet paint failures trace back to inadequate prep. Wood absorbs grease, cooking oils, and grime over years of use, creating a barrier that prevents paint adhesion. Skipping this stage guarantees chipping within months.
Cleaning and Degreasing Cabinet Surfaces
Start by removing all cabinet doors, drawers, and hardware. Label each piece with painter’s tape and a numbering system, reinstalling 20 identical doors without a map is a nightmare.
Clean every surface with a degreasing solution. Trisodium phosphate (TSP) is the gold standard for cutting through kitchen grease, but it requires gloves and good ventilation. Mix 1/4 cup TSP per gallon of warm water, scrub with a nylon brush, and rinse thoroughly with clean water. For a less caustic option, use a heavy-duty degreaser like Krud Kutter, which works well on moderate buildup. Let all surfaces dry completely, 24 hours minimum. Wood holds moisture, and trapping it under primer causes blistering.
Pay special attention to areas around handles and the top edges of upper cabinets. These spots collect the most grease and are often overlooked. A second pass with degreaser is common for cabinets above the stove.
Sanding and Repairing Wood Imperfections
Sanding serves two purposes: it removes the existing finish’s sheen so primer can grip, and it smooths out dings and rough grain. Use 120-grit sandpaper for the initial pass on flat surfaces. A random orbital sander speeds up the job on large door panels, but hand-sand edges, corners, and any profiled details to avoid rounding over crisp lines.
After the first sanding, inspect for damage. Fill dents, scratches, and gouges with a two-part wood filler like Bondo Wood Filler. It dries faster and harder than single-part fillers, and it won’t shrink. Apply slightly overfilled, let cure per manufacturer instructions (usually 15–30 minutes), then sand flush with 180-grit paper.
If cabinet doors have a heavy polyurethane or lacquer finish, consider a liquid deglosser (also called liquid sandpaper) after the initial sanding. It chemically etches the surface for better adhesion without additional abrasion. Wipe it on, wait five minutes, and wipe off.
Finish with a 220-grit sanding to smooth everything. Wipe down all surfaces with a tack cloth or a damp microfiber towel to remove dust. Any dust left behind will telegraph through the paint as grit.
Safety note: Wear a dust mask or respirator during sanding, especially if the cabinets are older. Pre-1978 cabinets may have lead-based paint, which requires special handling and testing.
Choosing the Right Paint and Primer for Kitchen Cabinets
Not all paints hold up to the daily abuse cabinets endure, grease splatters, repeated cleaning, and constant handling. The wrong product will chip, yellow, or feel tacky months later.
Primer is non-negotiable. Use a bonding primer designed for slick surfaces, such as KILZ Adhesion or Zinsser B-I-N shellac-based primer. These grip bare wood, old paint, and even laminate. Shellac primers also block tannin bleed from woods like oak or cherry, which can yellow white paint. Oil-based primers offer superior adhesion and stain-blocking, but they require mineral spirits for cleanup and longer dry times. Water-based bonding primers are easier to work with and dry faster, making them a solid choice for most DIYers.
For paint, choose either acrylic alkyd (also called hybrid or water-based alkyd) or 100% acrylic latex cabinet enamel. Acrylic alkyds level beautifully and cure to a rock-hard finish, mimicking the durability of traditional oil-based paints without the solvent smell or long dry times. Examples include Benjamin Moore Advance and Sherwin-Williams Emerald Urethane Trim Enamel. These self-level well, reducing brush marks.
100% acrylic latex enamels, like Benjamin Moore Regal Select in a semi-gloss or satin sheen, work if applied carefully, but they don’t self-level as much. They’re more forgiving for beginners and clean up with soap and water.
Avoid flat or eggshell finishes in kitchens, they can’t handle scrubbing. Satin or semi-gloss sheens are standard for cabinets, offering cleanability without excessive shine. Many DIY furniture projects use similar finishes for durability.
Sheen matters. Satin hides minor surface imperfections better than semi-gloss but isn’t quite as scrubbable. Semi-gloss shows every flaw, so surface prep must be flawless. For darker colors, semi-gloss amplifies depth. For whites and off-whites, satin feels softer and more modern.
Plan on one gallon of primer and one gallon of paint per coat for an average 10×12 kitchen with 20 cabinet doors. Coverage varies by product and application method, but figure 350–400 square feet per gallon. Buy extra, running out mid-project and trying to color-match later is risky.
Step-by-Step Cabinet Painting Process
Painting cabinets is about technique and patience. Rushing leads to drips, brush marks, and uneven coverage. Set up a dedicated workspace, garage, basement, or spare room, with good ventilation and minimal dust.
Priming Your Cabinets for Maximum Durability
Lay cabinet doors flat on sawhorses or a sturdy table. Painting flat prevents drips and runs, especially with self-leveling products. Cover the work surface with rosin paper or a drop cloth, plastic sheeting can stick to wet paint.
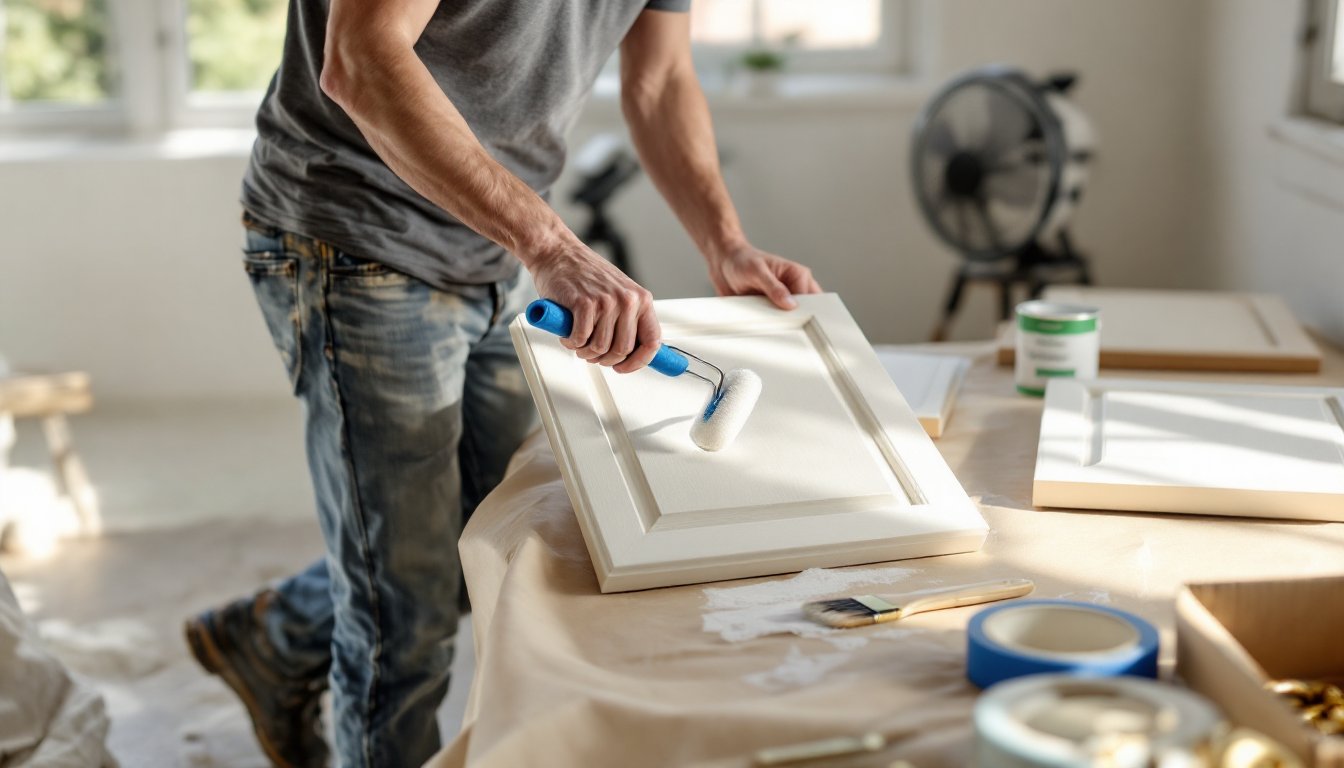
Stir primer thoroughly. Don’t shake it, shaking introduces air bubbles that show up in the finish. Use a high-quality synthetic brush (2–2.5 inches) for edges and detailed areas, and a 4-inch foam roller with a 1/4-inch nap for flat surfaces. Foam rollers leave the smoothest finish on cabinets. Some pros prefer a fine-finish roller (like a Purdy White Dove) paired with a paint additive like Floetrol to extend open time and reduce brush marks.
Apply primer in thin, even coats. Start with the inside edges and any profiled details (use the brush), then roll the flat surfaces. Work in the direction of the wood grain. Don’t overload the brush or roller, excess product creates sags.
Prime the cabinet boxes (the frames still mounted to the wall) with the same method. Remove all shelves and prime them separately. If painting the interior, do that first: most homeowners leave interiors unpainted to save time.
Allow primer to dry per the manufacturer’s instructions, usually 1–2 hours for water-based and 4–6 hours for oil-based. Some primers allow recoating sooner, but longer dry times improve adhesion.
Lightly sand primed surfaces with 220-grit paper or a fine sanding sponge to knock down any raised grain or dust nibs. Wipe clean with a tack cloth. This step is critical for a glass-smooth topcoat.
Applying Paint for a Smooth, Professional Finish
Paint application mirrors priming but requires more finesse. Thin coats are everything, two or three thin coats always outperform one thick coat. Thick coats sag, take forever to cure, and remain soft longer.
Stir paint gently. If using an acrylic alkyd, it may seem thick out of the can, that’s normal. Some pros thin the first coat by 10% with water (for water-based) to improve flow, but check the product’s data sheet first. Over-thinning compromises durability.
Apply the first coat with the same brush-and-roll technique: brush the edges and details, roll the flats. Keep a wet edge, don’t let the paint start to dry before overlapping strokes, or you’ll see lap marks. Work quickly but smoothly. Acrylic alkyds and cabinet enamels have longer open times than standard latex, giving more working time.
If using a paint sprayer (HVLP or airless), practice on scrap first. Spraying delivers the smoothest finish but requires masking the entire kitchen, thinning paint correctly, and dealing with overspray. For most DIYers, rolling is more practical. Many successful room makeovers feature hand-rolled cabinets that look professionally sprayed.
Let the first coat dry per the label, usually 1–4 hours. Acrylic alkyds can be recoated sooner than they fully cure. Lightly sand between coats with 320-grit paper or a fine sanding sponge, just enough to smooth any imperfections. Wipe with a tack cloth.
Apply a second coat, using the same technique. For darker colors or whites over dark wood, a third coat may be necessary for full opacity and even color. Don’t skip the between-coat sanding, it’s the difference between “nice” and “pro.”
Cure time is not the same as dry time. Most cabinet paints dry to the touch in hours but take 7–14 days to fully cure and harden. During this period, handle doors gently. Don’t stack them or reinstall hardware until the paint is fully cured, or you risk dents and marks. Some budget painting tutorials emphasize this curing period as the most commonly overlooked step.
Reinstall hardware and doors after the full cure time. If installing new hardware, measure carefully, misaligned holes are obvious. Use a template or measuring jig for consistent placement across all doors.
Safety reminders: Work in a well-ventilated space. Wear safety glasses when sanding, and a respirator (not just a dust mask) if using solvent-based products or working with fine paint mist. Keep a fire extinguisher nearby if using oil-based or flammable products.