
A dated bathroom vanity can drag down an entire room, but replacing it isn’t cheap, new vanities run anywhere from $300 to $2,000+ depending on size and quality. Painting an existing vanity offers a fraction of the cost and delivers dramatic results in a single weekend. The difference between dingy laminate or outdated oak and a crisp, modern finish is striking, and the project requires no specialized carpentry skills. With the right prep work and materials, even a beginner can achieve a durable, professional-looking finish that holds up to daily moisture and wear.
Key Takeaways
- Painting a bathroom vanity costs $50–$150 in materials versus $300–$2,000+ for replacement, delivering dramatic before-and-after results in a single weekend.
- Proper prep work—cleaning, sanding, and priming—is essential; modern cabinet-grade paints formulated for moisture resistance hold up as well as factory finishes when applied correctly.
- Successful vanity painting requires a foam roller, quality cabinet paint, stain-blocking primer, and patience during the 7–14 day full cure period before reassembly.
- Common transformations include updating honey oak to white or gray, refreshing tired laminate, and creating bold color statements with navy or charcoal finishes paired with upgraded hardware.
- Gentle maintenance using mild soap and water, combined with small touch-ups on chips, ensures a painted bathroom vanity lasts as long as professionally refinished furniture.
Why Painting Your Bathroom Vanity Is Worth the Effort
The return on investment for painting a bathroom vanity is hard to beat. Material costs typically run between $50 and $150 depending on primer, paint quality, and hardware upgrades, substantially less than replacement.
Beyond cost savings, painting allows complete control over aesthetics. Outdated honey oak can become sleek navy, white, or charcoal. Chipped laminate gets a second life. The transformation updates the entire bathroom without touching tile, fixtures, or flooring.
Moisture resistance is a valid concern, but modern water-based cabinet paints and proper sealing techniques create finishes that withstand humidity as well as factory coatings. Brands like Benjamin Moore Advance and Sherwin-Williams Emerald Urethane are formulated specifically for high-moisture environments and heavy use.
This is a cosmetic project, not structural work, so no permits are required. Most homeowners complete the job in two to three days, accounting for drying time between coats. Real-world examples from DIY home blogs demonstrate how paint alone can make a 20-year-old vanity look custom and current.
What You’ll Need to Paint a Bathroom Vanity
Gather materials before starting to avoid mid-project runs to the hardware store.
Materials:
- Deglosser or TSP (trisodium phosphate): Essential for cleaning and dulling glossy finishes
- Sandpaper: 120-grit and 220-grit
- Wood filler: For repairing dings or stripped screw holes
- Primer: Stain-blocking, adhesion primer (Zinsser B-I-N or Kilz Adhesion are reliable)
- Cabinet paint: Water-based acrylic or urethane enamel in satin or semi-gloss
- Topcoat (optional): Polycrylic or water-based polyurethane for added durability
- Painter’s tape
- Drop cloths
- Foam rollers (4-inch) and synthetic angle brushes
Tools:
- Electric sander or sanding block (orbital sanders speed the process but aren’t required)
- Screwdriver or drill for removing hardware
- Tack cloth or microfiber rags
- Small paint tray
- Ventilation fan or open window
Safety Gear:
- Safety glasses
- Nitrile gloves
- Respirator mask (especially when using oil-based primers or working in poorly ventilated spaces)
Choose paint specifically labeled for cabinets or trim. Standard wall paint lacks the hardness and adhesion needed for surfaces that get regular contact and cleaning.
Step-by-Step: How to Paint Your Bathroom Vanity
Preparing the Vanity Surface
Prep work determines whether paint lasts two years or twenty. Skipping steps here is the most common reason DIY paint jobs fail.
-
Remove doors, drawers, and hardware. Label door hinges and drawer pulls with painter’s tape so reassembly is straightforward. Paint these components separately on sawhorses or a workspace outside the bathroom.
-
Clean all surfaces thoroughly. Use a deglosser or TSP solution to remove soap scum, oils, and grime. Bathrooms accumulate residue that prevents adhesion. Rinse with clean water and let dry completely.
-
Sand the vanity. Use 120-grit sandpaper to scuff the existing finish. The goal isn’t to strip down to bare wood, just to dull the surface so primer grips. An orbital sander speeds this up, but hand sanding works fine on smaller vanities. Wipe away dust with a tack cloth.
-
Fill imperfections. Apply wood filler to dents, scratches, or stripped screw holes. Let it cure per manufacturer directions (usually 30 minutes to an hour), then sand smooth with 220-grit paper.
-
Tape off areas. Protect walls, countertops, and the floor with painter’s tape and drop cloths. Tape off the interior of cabinets if not painting the insides (most people skip interiors to save time).
Applying Primer and Paint
Primer is non-negotiable. It blocks stains, prevents bleed-through from wood tannins, and creates a uniform base for topcoats.
-
Apply primer. Use a foam roller for flat surfaces and an angle brush for edges, grooves, and detailed areas. A roller minimizes brush strokes. One coat is usually sufficient, but dark or stained wood may need two. Allow the primer to dry fully, typically 1 to 2 hours, though oil-based primers can take longer.
-
Sand lightly between coats. After the primer dries, lightly scuff with 220-grit sandpaper. This step smooths any raised grain or imperfections. Wipe away dust.
-
Apply the first coat of paint. Use thin, even coats rather than one thick layer. Thick coats sag, drip, and take forever to cure. Roll with light pressure, then tip off with the brush to smooth out texture. Let dry completely, check the can, but most cabinet paints need 4 to 6 hours.
-
Apply a second coat. Two coats are standard for full coverage and durability. If edges or corners look thin after the second coat, a third touchup coat on those areas won’t hurt.
-
Consider a topcoat. For vanities that see heavy use, especially those with kids, a clear polycrylic topcoat adds a layer of protection against chipping and moisture. It’s optional but extends the life of the finish. Apply one or two coats with a foam roller, sanding lightly between.
-
Cure before reassembly. Paint may feel dry to the touch within hours, but full cure takes 7 to 14 days depending on the product. Wait at least 48 hours before reattaching hardware and reinstalling drawers. Avoid heavy use during the first week.
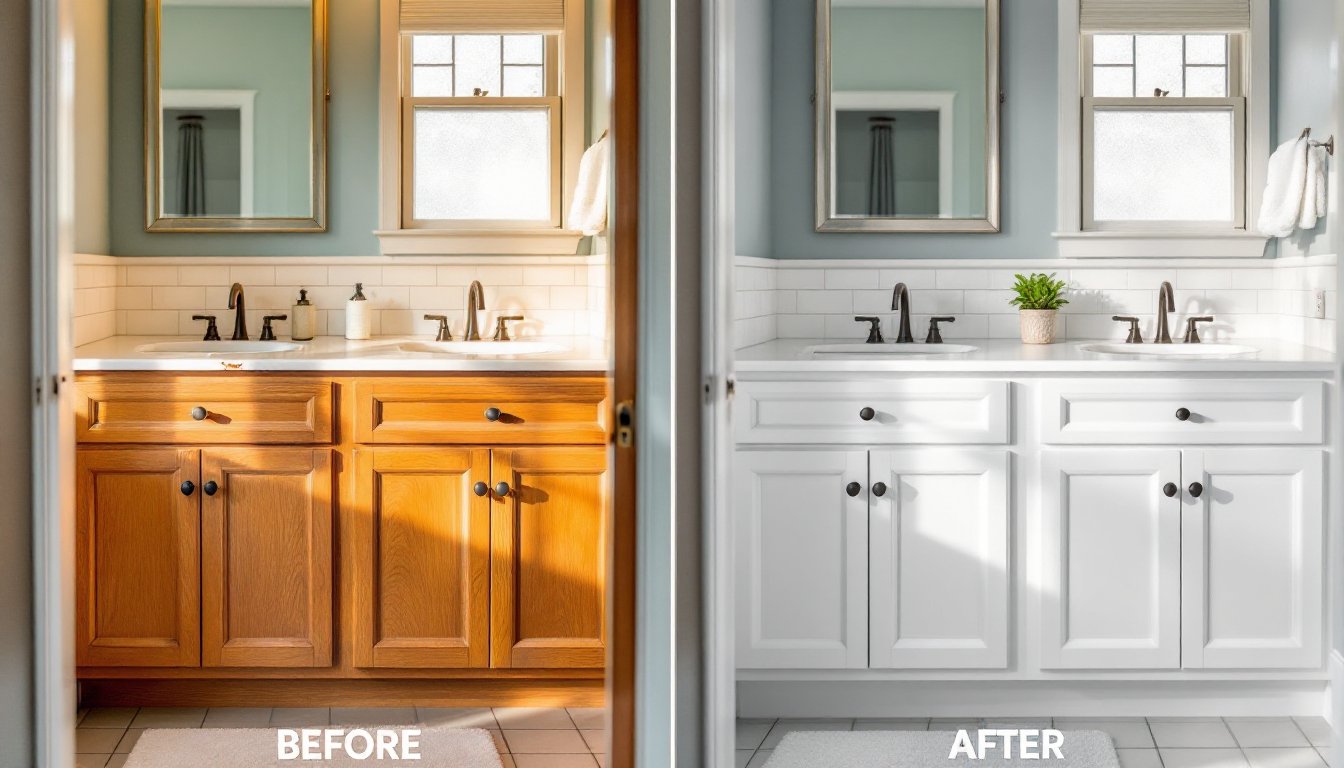
Real Before and After Transformations: What’s Possible
Visual proof sells the project. DIY bloggers and home improvement communities showcase vanity transformations that look like professional remodels.
Common before-and-after themes include:
- Oak to white or gray: Honey oak vanities from the 1990s and early 2000s get a modern, clean update with white, soft gray, or greige paint. The style shift is immediate.
- Laminate refresh: Tired laminate vanities, once considered disposable, gain new life with proper adhesion primer and cabinet-grade paint. The finish hides the plastic texture surprisingly well.
- Bold color statements: Navy, forest green, and charcoal finishes add sophistication. Paired with brass or matte black hardware, they create a custom look without custom pricing.
Bloggers at Addicted 2 Decorating have documented multiple vanity makeovers, showing how paint alone, often combined with new pulls or knobs, completely changes a bathroom’s personality. Similarly, projects featured on Making Manzanita demonstrate that even beginners can achieve smooth, durable finishes with patience and the right materials.
Another popular example involves using two-tone finishes: painting the vanity base one color and leaving or staining the countertop a contrasting tone (if it’s wood). These approaches offer flexibility and creativity without requiring advanced skills.
Homeowners frequently pair vanity painting with small upgrades like new faucets, mirrors, or lighting, multiplying the transformation effect for minimal additional cost.
Tips for Long-Lasting Results
A painted vanity will last as long as the prep work and materials behind it.
Use the right paint. Not all paints are equal. Standard latex wall paint will chip and peel in a bathroom. Cabinet-specific paints have higher resin content, which creates a harder, more durable finish. Water-based options cure with less odor and clean up easier than oil-based, but both work well if applied correctly.
Don’t rush cure time. Even if paint feels dry, it hasn’t fully hardened. Drawers slammed shut too early can stick or mar. Wait a full week before placing heavy items on shelves or dragging objects across the surface.
Ventilate during and after. Proper airflow speeds drying and reduces the chance of dust or debris settling into wet paint. A bathroom fan or box fan in the window helps significantly.
Clean gently. Once cured, painted vanities can be wiped down with mild soap and water. Avoid abrasive scrubbers or harsh chemicals like bleach, which can dull or damage the finish over time.
Address issues before they spread. If a chip occurs, sand it lightly and touch up with leftover paint. Small repairs prevent larger failures.
Upgrade hardware while the vanity is disassembled. New pulls or knobs cost $3 to $10 each and make a noticeable difference. If existing holes don’t match new hardware, fill the old holes with wood filler, sand smooth, and drill fresh ones.
Finally, real-world inspiration from Young House Love and similar DIY-focused sites shows that painted vanities hold up well even in high-traffic family bathrooms, provided the work is done right. The key is treating it like a furniture refinishing project, not a quick craft.